Best car battery terminal cleaner is really about one job, stopping battery corrosion so your car starts reliably and your charging system stops fighting extra resistance.
If you have a “click” start, dim lights, or that crusty blue-green powder around the posts, a cleaner can help, but only if you match the product type to what you’re seeing and you use it safely.
This guide breaks down what actually works, when a spray is enough versus when you need a brush and protectant, and how to avoid the common mistakes that waste time or create safety risks.
What “battery terminal cleaner” means (and why it matters)
Shoppers lump everything into “cleaner,” but in practice you’re choosing between a few categories, and each solves a slightly different problem.
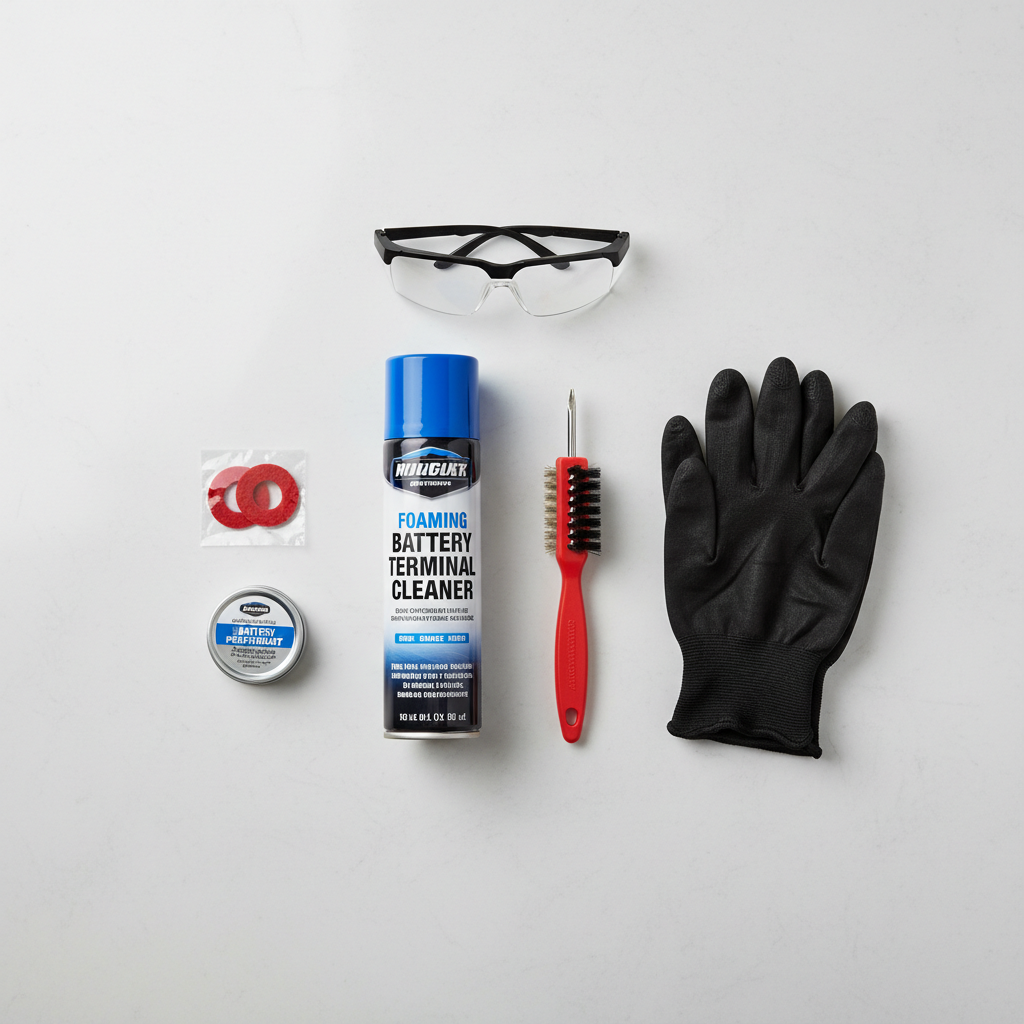
- Foaming spray cleaner (often color-changing): neutralizes acid residue and lifts surface corrosion so you can rinse or wipe.
- Brush tools: physically remove crust from posts and inside cable clamps, which sprays can’t fully reach.
- Contact cleaner: for electrical contacts and grime, usually not meant to neutralize acid corrosion by itself.
- Battery terminal protectant (spray/gel/felt washers): prevents future buildup after you clean.
Most people get better results by treating it like a small system: clean, scrub, dry, then protect. If you only buy “cleaner” and skip the last step, corrosion often returns faster than you’d like.
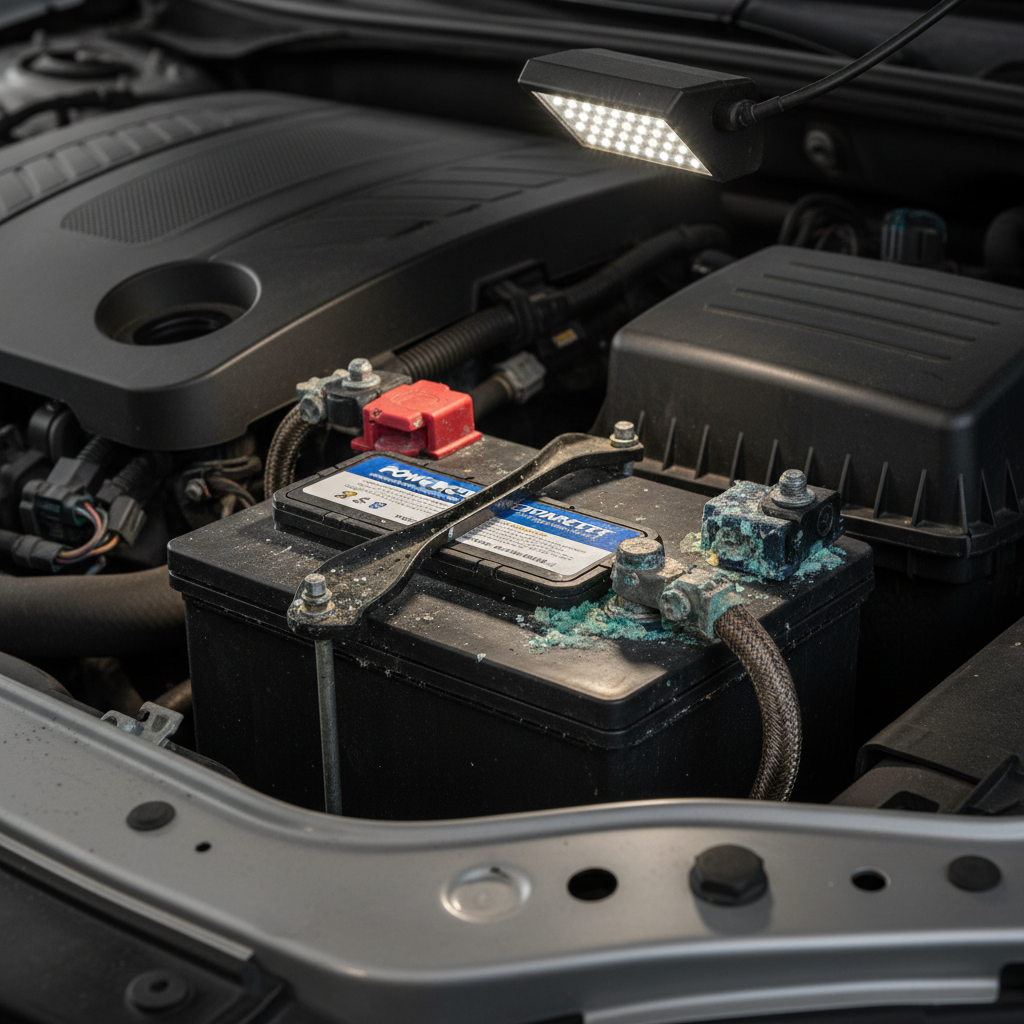
Why terminals corrode in the real world
Terminal corrosion typically comes from battery acid vapor, moisture, and chemical reactions at the connection. It’s common, and it doesn’t automatically mean your battery is “bad,” but it does mean the connection needs attention.
- Normal venting and acid mist: especially on older batteries or some driving patterns.
- Loose or slightly misaligned clamps: tiny gaps invite oxidation and heat.
- Overcharging: can increase gassing, though diagnosis depends on the vehicle and charging system.
- Road salt and humidity: speed up corrosion, especially in coastal and snow-belt states.
- Battery age: older units may vent more or have more seepage around posts.
According to the National Safety Council (NSC), batteries contain corrosive electrolyte and can present burn hazards, so it’s worth treating this as a safety task, not a quick wipe-and-go.
Quick self-check: do you need cleaner, a tool, or a replacement?
Before you pick the best car battery terminal cleaner for your situation, do a fast check. It saves you from buying the wrong product and blaming the cleaner.
Signs a cleaner + brush is usually enough
- White/blue-green crust on the outside of clamps and posts
- Car starts, but cranks a bit slower than usual
- Headlights dim slightly at idle
Signs you may need more than cleaning
- Heat damage on the cable end (melted plastic, brittle insulation)
- Swollen battery case or strong sulfur smell
- Recurring heavy corrosion within weeks (could be charging issue or battery nearing end of life)
- Clamps that won’t tighten securely (worn hardware)
If you see swelling, leaking, or damaged cables, consider asking a mechanic or parts-store tech to take a look. Cleaning is helpful, but it can’t “fix” a compromised battery or unsafe wiring.
Comparison table: what to buy for your situation
Below is a practical way to choose. Brand matters less than matching the product type to the job and using it correctly.
| Product type | Best for | Pros | Limitations |
|---|---|---|---|
| Foaming battery terminal cleaner spray | Acid residue + light/medium corrosion | Fast, easy, good visual coverage | Still needs brushing for heavy buildup; overspray risk |
| Terminal/post brush (two-sided) | Heavy crust, poor clamp contact | Restores metal-to-metal contact | Requires disconnecting terminals; can fling debris |
| Battery-safe degreaser (non-acidic) | Oily grime around battery tray | Cleans dirt that traps moisture | Does not neutralize acid corrosion well on its own |
| Protectant spray or gel | Preventing repeat corrosion | Extends time between cleanings | Must be applied to clean, dry surfaces |
| Felt anti-corrosion washers | Extra barrier at base of post | Cheap, simple add-on | Not a substitute for cleaning or proper clamp tightness |
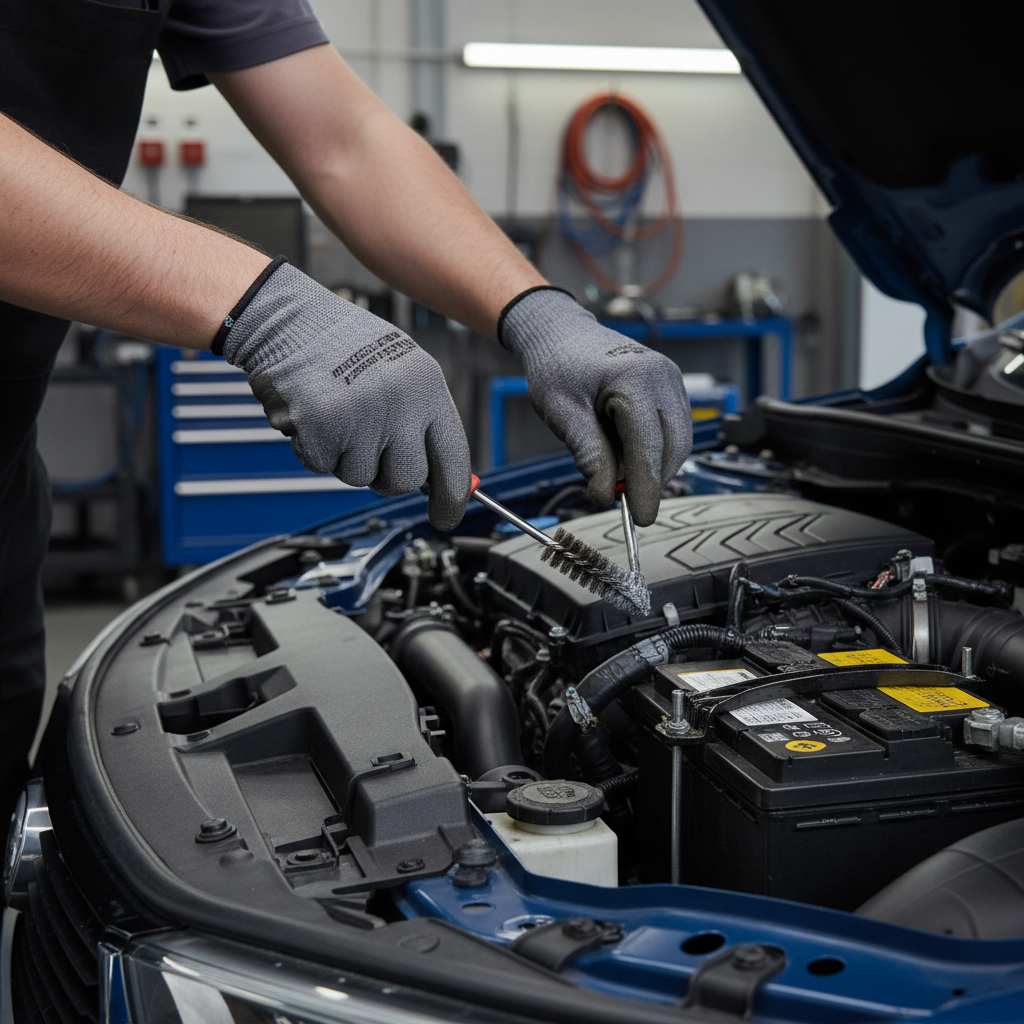
How to use a battery terminal cleaner (safe, no drama)
Best car battery terminal cleaner won’t help much if the process is sloppy. The goal is clean metal contact and a protected connection, without splashing acid or shorting tools.
Before you start
- Park in a ventilated area, engine off, keys out.
- Wear gloves and eye protection. Battery residue can irritate skin and eyes.
- Gather: cleaner spray, terminal brush, rags/paper towels, water (if the product requires rinsing), and protectant.
Step-by-step
- Disconnect negative (-) first, then positive (+). This reduces accidental short risk.
- Spray the terminal cleaner on posts and clamps, let it foam per label instructions.
- Scrub posts and inside the clamps with the brush until you see clean metal.
- Wipe residue, and rinse only if the cleaner calls for it. Keep runoff controlled around paint and wiring.
- Dry thoroughly, moisture invites quick re-corrosion.
- Apply protectant (spray/gel) and/or install felt washers.
- Reconnect positive (+) first, then negative (-). Tighten snug, not “gorilla tight.”
According to OSHA, eye and face protection is appropriate when there’s a risk from corrosive liquids, which applies here in many garage situations.
What separates “best” from “fine”: buying criteria that actually matter
The best picks usually win on usability, not hype. When you’re standing in an auto parts aisle, these details tend to predict whether you’ll get a clean result in one pass.
- Clear label guidance: whether to rinse, how long to dwell, and where not to spray.
- Targeted nozzle: less overspray onto painted surfaces and belts.
- Foam behavior: thicker foam clings better on vertical clamps, especially on side-post setups.
- Residue control: wipes off without leaving a slick film where you need metal contact.
- Compatibility notes: some products caution around certain metals or finishes, read it.
If you only buy one thing, many drivers get the most mileage from a mid-priced foaming spray plus a decent terminal brush. Add a protectant if you deal with humidity, salt, or short-trip driving.
Common mistakes that make corrosion come back
Corrosion returning quickly can be a product issue, but it’s often technique. These are the repeat offenders.
- Not disconnecting terminals: you avoid scrubbing inside the clamp, which is where poor contact lives.
- Skipping the brush: spray alone usually can’t restore a pitted, crusted connection.
- Leaving moisture behind: water trapped under the clamp becomes a corrosion incubator.
- Applying protectant on dirty metal: you seal in the problem.
- Loose clamp after reassembly: even slightly loose connections accelerate buildup and starting issues.
When you should stop DIY and get help
Cleaning terminals is usually straightforward, but a few situations raise the stakes. If any of these pop up, it’s reasonable to involve a professional, especially if you’re not comfortable around electrical systems.
- Battery case looks swollen, cracked, or leaking
- Cables feel hot after driving, or you see burned/charred metal
- Corrosion returns fast and you suspect a charging problem
- Vehicle has complex battery management (common in newer cars), or the battery sits in a hard-to-access location
According to the U.S. Department of Transportation (FMCSA), battery hazards include corrosive electrolyte and explosive gases, so if you’re seeing unusual heat, odor, or damage, stepping back is the safer call.
Key takeaways (so you can pick fast)
- Cleaner + brush solves most corrosion problems better than spray alone.
- The “best” option fits your buildup level, and comes with clear use instructions.
- Drying and protectant matter if you want the fix to last.
- Swelling, leaks, or recurring heavy corrosion may point to a bigger issue than dirty terminals.
If your goal is fewer no-start mornings, start by choosing a best car battery terminal cleaner that matches your corrosion level, then do the full clean-and-protect routine once, it usually pays off quickly.
FAQ
What is the best car battery terminal cleaner for heavy corrosion?
In many cases, a foaming terminal cleaner plus a proper terminal/post brush works better than any “stronger” chemical alone, because heavy buildup needs mechanical removal to restore metal contact.
Can I use household baking soda instead of a battery terminal cleaner?
Baking soda and water can neutralize acid residue, but it can be messy and easy to over-apply. A purpose-made spray is often more controlled, and you still want a brush either way.
Do I need to disconnect the battery to clean the terminals?
For a meaningful cleaning, yes, because the inside of the clamp is part of the electrical contact. Disconnecting also reduces the chance of accidental shorting while scrubbing.
Is terminal corrosion a sign my alternator is bad?
Not automatically. Corrosion can happen from normal conditions, but if it returns quickly or you also notice charging warnings, testing the charging system is a smart next step.
Should I use a protectant spray after cleaning?
If you want the result to last, protectant helps in many climates, especially where there’s humidity or road salt. Apply it only after the metal is clean and dry.
How often should I clean battery terminals?
There isn’t one schedule for every vehicle, but checking during oil changes or seasonal maintenance works for many drivers. Clean when you see buildup, not just by the calendar.
Can battery terminal cleaner damage my car?
It can if overspray sits on paint or sensitive components, or if you mix incompatible chemicals. Follow label directions, control runoff, and when in doubt, use small amounts and wipe promptly.
If you’re trying to choose between a couple products and want a more “set it and forget it” outcome, look for a kit approach, cleaner plus brush plus protectant, and plan to spend an extra five minutes on drying and re-tightening, that’s usually where the longevity comes from.