how to clean car interior air vents brush is one of those tasks that looks minor, until you notice the dust blowing back into your face, that stale smell when the A/C kicks on, or the vents that just don’t seem to move air like they used to.
The good news, a brush-based clean is usually fast, low-risk, and doesn’t require disassembling your dash, if you do it in the right order. The not-so-good news, lots of people accidentally push debris deeper into the ductwork or soak electronics with cleaner.
This guide focuses on what works in real life: choosing the right brush, controlling dust, cleaning without leaving streaks, and knowing when the smell or airflow issue is bigger than “dirty vents.”
What causes dirty vents (and when it’s more than dust)
Most vent grime is a mix of household-style dust, fabric lint, and oily film that drifts off dashboards and interior plastics. It sticks especially fast in cars that park outside, drive with windows down, or run the fan a lot.
- Dust buildup on the louvers: visible gray fuzz along vent edges, often returns quickly if you wipe without capturing dust.
- Oily residue: slightly shiny film that smears, common with interior “shiny” dressings or certain cleaners.
- Pollen and fine grit: seasonal, worse for allergy-prone drivers.
- Musty odor: sometimes just vent dust, but often tied to moisture on the evaporator core or a neglected cabin air filter.
According to EPA, improving indoor air quality involves reducing particle sources and maintaining filtration, the cabin filter matters more than most people think when odor or dust keeps coming back.
Tools and products that make brushing vents easier
You can clean vents with almost any soft brush, but the right tool changes the result. Stiffer bristles can scratch glossy trim, and oversized brushes just knock dust around.
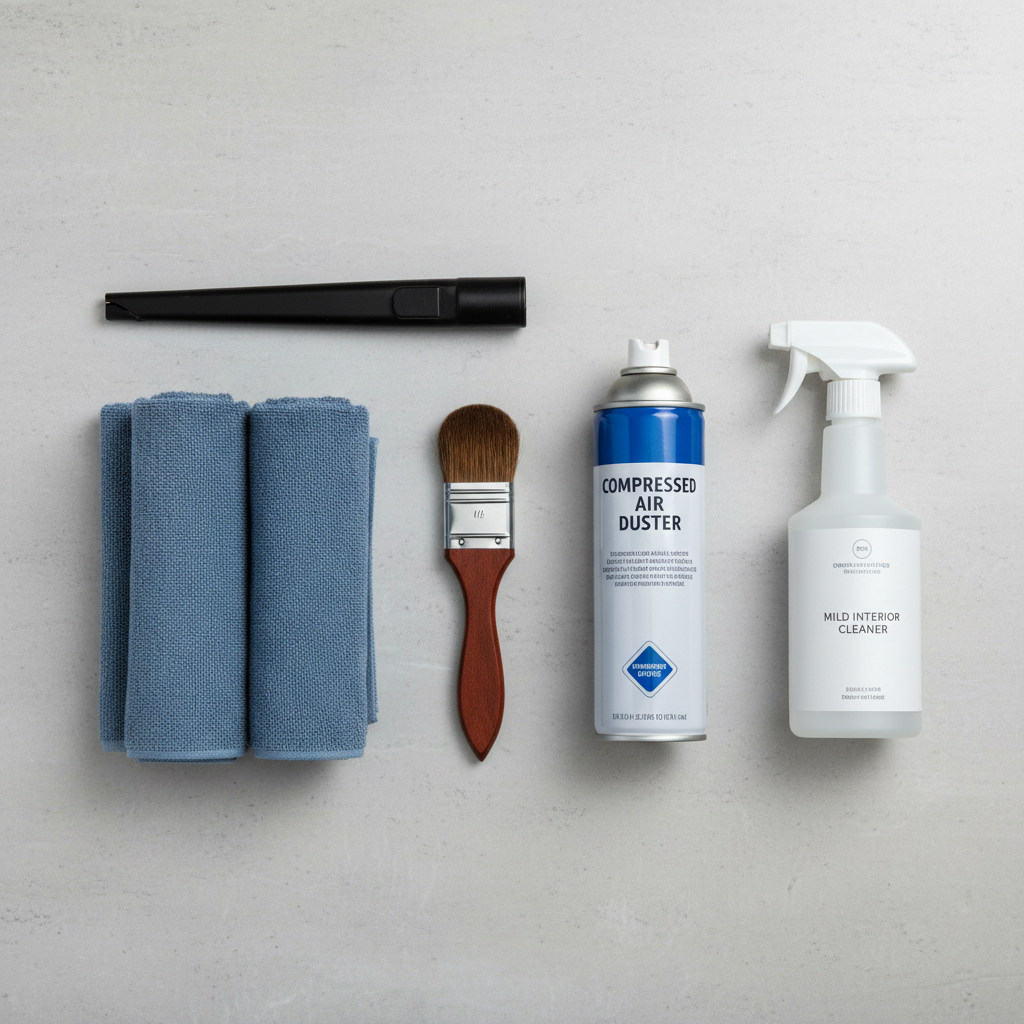
- Soft detailing brush (boar-hair or synthetic): gentle on vent fins and surrounding trim.
- Microfiber towels: one for catching dust, one for final buff.
- Vacuum with crevice tool: helps you remove loosened debris instead of redistributing it.
- Mild interior cleaner (optional): use sparingly, ideally sprayed onto a towel, not into the vent.
- Compressed air (optional): useful, but easy to overdo and blast dust deeper.
Brush size tip: for most U.S. vehicles, a 1-inch detailing brush covers a lot without losing control, while a smaller “makeup-style” brush works for tight vent corners.
Quick self-check: which vent problem do you actually have?
Before you start, figure out whether you’re dealing with cosmetic dust, airflow restriction, or an odor issue. The steps overlap, but the “finish line” changes.
- Mostly cosmetic: you see dust on the vent face, no smell, airflow feels normal.
- Airflow feels weak: fan sounds normal but air output seems reduced, could be dust plus a clogged cabin filter.
- Musty or sour smell: worse when A/C starts, sometimes improves after a few minutes, often moisture-related.
- Sweet smell or fogging: can be coolant-related; stop guessing and consider a professional inspection.
Step-by-step: how to clean vents with a brush (without making a mess)
If your goal is a clean finish and less dust in the cabin, the trick is “loosen and capture,” not “scrub and blow.” This method works for most horizontal and vertical vent designs.
1) Prep the area (2 minutes that save you 20)
- Turn the car off, set parking brake, and open a door for light and ventilation.
- Place a microfiber towel under the vents on the dash to catch fallout.
- If you have a vacuum, stage it with a crevice tool ready.
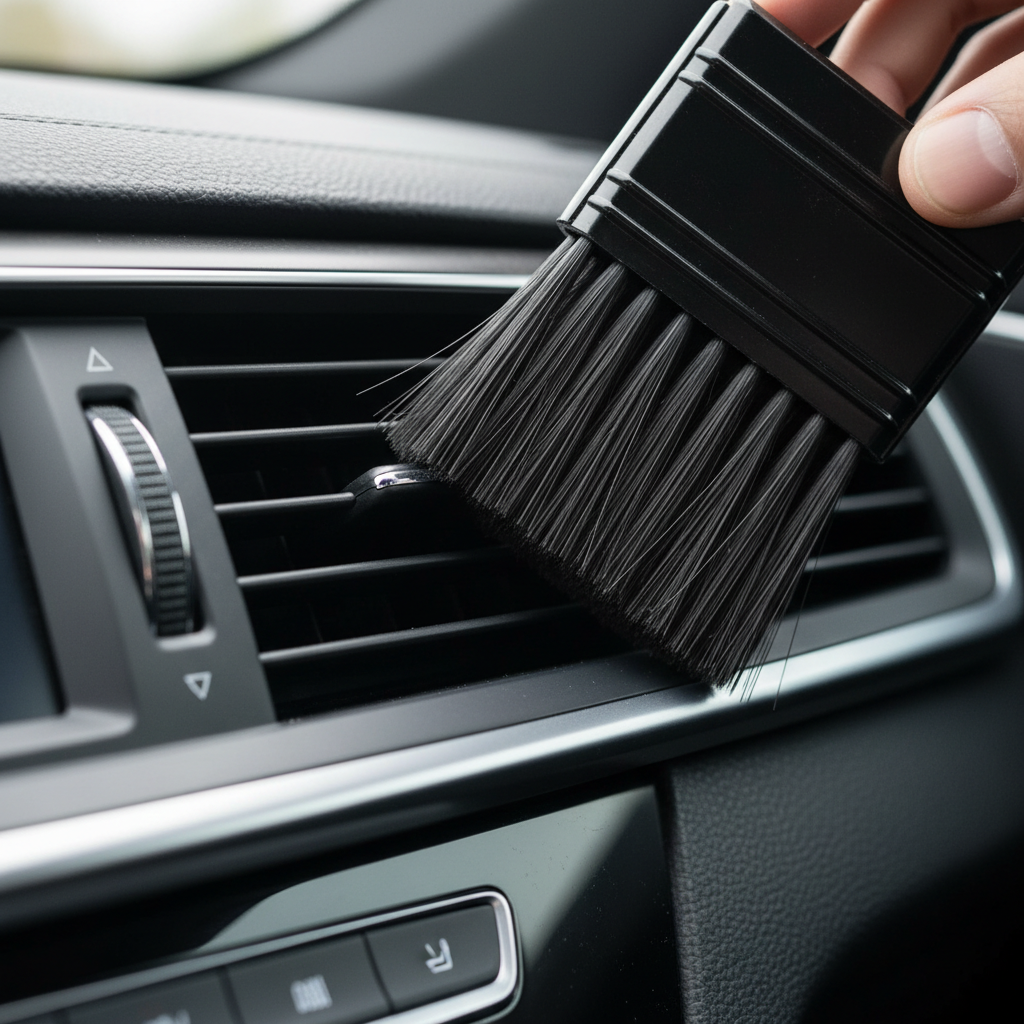
2) Dry brush the vent face
- Use gentle strokes along the vent slats, not aggressive back-and-forth scrubbing.
- Work from top to bottom so debris drops onto your towel.
- For corners, pinch the microfiber around a finger, then brush into it so dust transfers.
3) Vacuum as you go
- Hold the crevice tool close to the vent opening while brushing.
- Keep suction near the bristles so loosened dust gets captured immediately.
4) Spot-clean sticky residue carefully
- Lightly spray cleaner onto a towel, not into the vent.
- Wipe the vent face and surrounding bezel, then do a final pass with a dry microfiber.
- Avoid soaking the louvers; liquids can run into ductwork and may create new odor problems.
5) Optional “fan purge” (use restraint)
If you suspect loose dust inside the first part of the duct, you can run the fan for 30–60 seconds after brushing. Keep windows open. If you use compressed air, short bursts only, and keep the nozzle at a distance to avoid forcing debris deeper.
Brush vs other methods: what to use, and when
People ask whether a brush is “enough.” Often it is, but some situations benefit from pairing methods. Here’s a practical comparison.
| Method | Best for | Watch-outs |
|---|---|---|
| Soft brush + microfiber | Visible dust on vent face, routine maintenance | Can push dust inward if you don’t capture it with towel/vacuum |
| Vacuum crevice tool | Loose debris, pet hair near vent openings | Plastic nozzle can scuff trim if you press hard |
| Compressed air | Dry dust in tight gaps | Easy to blast dust deeper into ducts; wear eye protection if sensitive |
| Interior cleaner | Oily film and fingerprints on vent surrounds | Overspray into vents, streaking on glossy trim |

Common mistakes that keep vents dirty (or make odors worse)
- Spraying cleaner directly into vents: it can wet dust into sludge and may leave lingering chemical smell.
- Brushing without a towel or vacuum: you “clean,” then the first fan blast redistributes the same dust.
- Using stiff brushes or rough swabs: small scratches on vent fins show up fast in sunlight.
- Ignoring the cabin air filter: vent faces look great, but dust returns quickly and airflow stays weak.
- Overusing scented products: they mask odors but don’t remove the source, and some drivers find them irritating.
According to CDC, reducing exposure to airborne particles and irritants is generally helped by cleaning and filtration, so if you’re sensitive to dust, pairing vent cleaning with filter maintenance is usually a more meaningful step than adding fragrance.
If the smell or airflow persists: next steps that actually help
When people search how to clean car interior air vents brush, they’re often chasing an odor or weak A/C, not just dust. If you cleaned properly and the problem sticks around, try this order.
- Replace or inspect the cabin air filter: if it’s dark, packed with debris, or smells musty, swapping it can make an immediate difference.
- Check for dampness: wet floor mats or persistent window fogging can keep odors coming back.
- Run the fan without A/C for a few minutes: occasionally helps dry out moisture after short trips, though results vary by climate.
- Consider evaporator cleaning carefully: some foam cleaners are DIY-friendly, but if you’re unsure, a shop can handle it without guesswork.
If you notice symptoms like a sweet odor, unexplained coolant loss, or strong burning smells, it’s smarter to stop DIY cleaning and consult a qualified mechanic, because those can indicate issues beyond vent hygiene.
Key takeaways and a simple maintenance routine
Clean vents are mostly about consistency, not intensity. A light brush-and-vacuum pass every few weeks typically beats a once-a-year deep clean that turns into a dusty mess.
- Use a soft brush and capture dust with a towel or vacuum as you go.
- Keep liquids out of the vent by spraying cleaner onto microfiber, not the dash.
- If dust returns fast, check the cabin air filter and your interior cleaning products.
If you want an easy next step today, do one vent at a time, brush for 60 seconds, vacuum immediately, then move on, it stays tidy and you’ll actually finish the job.
FAQ
How often should I clean my car’s interior air vents with a brush?
For many drivers, a quick brush clean every 2–4 weeks keeps buildup from getting noticeable. If you park outside, drive dirt roads, or have pets, you may want to do it more often.
Is it safe to use a makeup brush to clean car vents?
Usually, yes, as long as the bristles are soft and clean. Avoid brushes with glittery product residue or stiff, scratchy fibers that can mark glossy trim.
Can I spray disinfectant or all-purpose cleaner into the vents?
It’s generally not a great idea for routine cleaning. Liquid can carry dust deeper, and overspray may reach sensitive components; if you want to use a cleaner, apply it to a towel first.
Why do my vents smell musty even after I brush them?
Brushing mainly addresses the vent face. Musty smells often come from moisture in the HVAC box, a tired cabin air filter, or organic buildup around the evaporator, which may need a different approach.
What brush works best for narrow or honeycomb-style vents?
A small detailing brush or a soft, narrow cosmetic brush gives better control. For tight patterns, pair the brush with a vacuum nearby so loosened dust doesn’t get trapped again.
Does cleaning vents improve A/C performance?
It can help a little if the vent face is heavily blocked, but major airflow problems are more commonly linked to the cabin filter, blower issues, or HVAC faults. If airflow feels unusually weak, checking the filter is a sensible first move.
What if I have allergies, should I do anything differently?
Consider wearing a mask and using a vacuum with good filtration while brushing. If symptoms persist in the car, a fresh cabin air filter and avoiding heavy fragrances often helps more than aggressive chemical cleaners, though individual sensitivity varies.
If you’re trying to keep vent dust under control without turning your interior into a detailing project, a small vent brush, two microfibers, and a quick routine can be the “good enough” solution that actually sticks, and if odors or airflow still feel off afterward, that’s usually your cue to look at the cabin filter or ask a shop to check the HVAC system.